Affiliate Disclosure Statement: Please note that some of the links I share with you are affiliate links, which means I will make a commission at no extra cost to you should you click through and make a purchase. Click Here for full statement.
How to build a basic emergency go bag: A go bag again is just that, it is a bag to grab if you have to evacuate quickly. You want at least a 3 day supply of stuff for everyone in the family. Try to find lightweight options since you might have to carry the bag a ways. If you have kids let them help pack their go bag and keep it light. They obviously won’t be able to carry all their supplies but they can carry some. You want to keep these kits close to the door so if you have like an earthquake and have to evacuate with no notice you can grab and go.
Now this is my opinion so you may feel other items are more essential or not agree with everything on my list. That is fine 🙂 you put in what YOU feel you and your family need for your kit. If possible find items that have multi uses to save on space and money. Such as Dr. Bronner’s Pure-Castile Liquid Soap – Baby Unscented, this soap works for hands/face/body – shampoo – dish soap – laundry soap and much more. It comes in different scents and they even have a Dr. Bronner’s 4 oz. Sampler- 5 Piece Gift Set. (5) 4 oz. This would be great to try it out AND then you have small bottles to go into your kits.
——
If you have kids please check out this post about How to Prepare for an Emergency with Kids
——
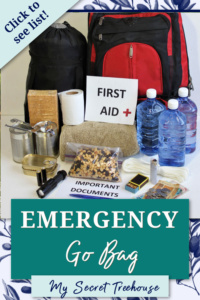
Essentials ~ Go Bag
You want to look for light weight options because you may have to carry your bag. For things like food, check out the camping stuff for freeze dried options. Those usually have a good shelf life and are light weight. If you have more than one go bag just distribute the weight as evenly as possible. Make sure each person can carry it though.
* Backpack for your kit * Water (one gallon per person per day for at least 3 days)
* First aid kit * Food (non-perishable, at least 3 days’ worth, nothing that needs to be cooked)
* Emergency ponchos * Hand operated can-opener (only if you have canned food in your go bag)
* Hand soap/hand sanitizer * Flashlight (if possible one that does not need batteries)
* Whistle to signal for help * Dust mask (N95, at least 1 per person)
* Duct tape * Plastic sheeting (for sheltering outside if needed)
* Lighter/water proof matches * Moist towelettes
* Garbage bags & ties * Wrench or pliers to turn off utilities & pry bar
* Utility/Pocket Knife * Battery/hand crank radio w/NOAA Weather radio
* Heavy Cord & work gloves * Extra batteries if needed for anything
* Pen & notepad * Water purification tablets/system
* Extra clothing * Additional special needs items (inhaler, etc.)
* Dish soap * Mess kit (plate/bowl set & silverware)
* Disposable Camera * Kleenex
* Medical items * Prescriptions (at least 7 days worth)
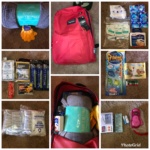
* Sleeping bag/thermal blanket * Kid specific items (click here to see a suggested list)
* Area maps * Copies of important documents (sealed in a waterproof container)
* $15-$20 small bills * Hygiene items (including feminine products & toilet paper)
* Emergency contact information * Medical history
* Over the counter medication (Tylenol, Benadryl, pepto, etc.)
* Glasses (throw in an old pair, better than nothing if yours get lost or damaged)
Comfort/additional Items ~ Go Bag
Remember this is going in a bag you may have to carry so don’t go overboard. This is something I struggle with because I tend to want a lot more than I can probably carry.
* Games (card, pencil & paper) * Snacks
* Chapstick * Books
* Photo album * Religious items
* Two-way radios * Extra car & house keys
* Chargers & cords * Personal comfort items
* Headlamp
* Homeopathic options (something calming like lavender, arnica tablets, etc.)
Click here for a printable copy of this list
How to Build a Basic Emergency Go Bag?
So if you are building your kit yourself you can either get it all at the same time. Or if you are anything like we were you can build it a bit at a time. Here is a general schedule of how to spread out your purchases over a 3 month period. This makes it easier when money is tight. No matter what you really need some basic emergency supplies in your house: food, water, first aid kit, emergency whistle & radio.
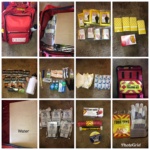
If you can afford to buy a pre-made go bag … great. That gets you all the basics and then all you have to do is add your personal items. For our house kit we chose the 4 person bag so we would have more than the 3 day supply.
(Click on the image to see the kit we got)
——
If you have kids please check out this post about How to Prepare for an Emergency with Kids
——
How to prepare for an emergency ~ other considerations
On top of making sure you have a kit for your house and a go bag there are some other considerations. Get a fire proof safe of any size. This will give you someplace safe to keep important documents. You want to make sure you include copies of important papers in your go bag. These can include social security cards, birth certificates, insurance policies, etc. One thing to also consider is to scan these items and put a copy on a thumb drive you keep in a fire proof safe.
Video/Photos
You might also include on this thumb drive a video you take of your house. This can help if you end up needing to file an insurance claim. Take a video of your house including, electronics, valuables, jewelry, firearms, etc. This can make claims easier since you have visual proof of what you are claiming was in your house. If you run a home business with product you want to make sure you have video or pictures of your inventory. You should also keep a copy of any serial numbers if possible. Keep a copy in your fire proof safe and/or on the thumb drive.
Comfort Items Ideas
Depending on the age of your child keeping a pack & play with your home kit may be a good idea. This can be used to keep them safe and give them a place to sleep if needed. You also might consider a travel high chair for evacuation purposes especially if you will be driving out. There are a couple options that would work depending on your child. There is something like the Summer Infant Pop and Sit Portable Booster or Portable Travel Baby High Chair Feeding Booster Safety Seat Harness.
If you are in an area that you might have to walk as a form of evacuation then also consider including a child carrier with your kit. Even if you don’t normally use one if you think you might have to walk a distance you will be glad you have one. Also if you live in tornado country a couple people have recommended including bike helmets. This make sense if you think about it, if things might be flying around having something to protect your head and your child’s head is a great idea.
Restock Cards
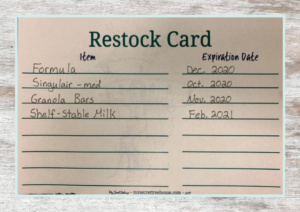
No matter what kind of kit you are preparing/getting you want to make sure you are rotating out items before they expire. Go ahead and fill out something like this Restock Card. You can list items on it that expire and their expiration dates. This way you can easily check your list every three months or so. For easy use of your restock card laminate it before using it. then you can write your items in with a permanent marker, and write the expiration dates in with a dry erase marker. This way when you pull out items that are about to expire you can easily fill in the new expiration date.
You want to rotate items out before they expire so you can use the items you pulled out. This way you are not wasting money on items that never get used. Tape this card to the top of your box on lay on the top of your stuff in your go bag. This way you can easily get to it and look to see what needs to be rotated out.
For items that do have an expiration date it might help to put stickers on the items with the dates clearly written. Sometimes finding the dates can be difficult and by putting the sticker with the date easily seen you will make the job easier.
If you can think of something that I did not think about please feel free to comment 🙂 I hope this information helps you to be more prepared if you are ever in an emergency.

 If you have kids please check out this post about How to Prepare for an Emergency with Kids.
Check out my other posts on preparing for emergencies:
* How to Build an Emergency Home Kit
* How to Build an Emergency Pet Kit